
Blooming
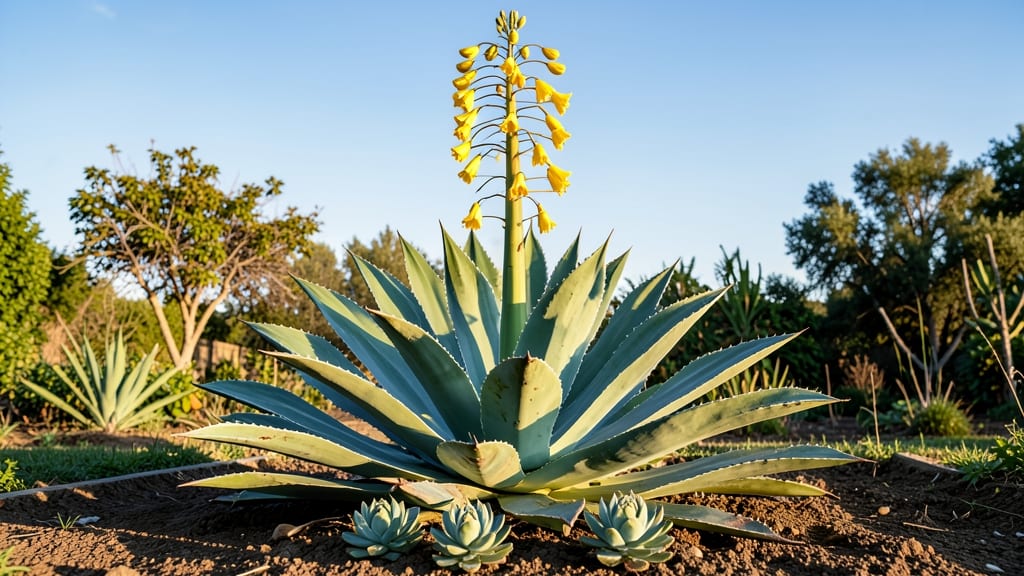
When your agave sends up that dramatic death bloom, don't despair—those pups at its base are your free new plants. 🌱 I've watched my agaves go from a single dramatic stalk to a whole nursery of offsets, and the process is simpler than it looks.
The mother plant will die after blooming, but those pups at the base are ready to become your next generation of agaves.
You'll need sharp pruners, a clean pot or garden bed, and a little patience. The pups form at the base of the mother plant during the blooming process, connected by roots.
Once the mother plant dies back, you can carefully separate these pups—each one capable of becoming a full-sized agave in 3-5 years.
After separation, let the pups dry out for a day or two before planting. They establish quickly in well-draining soil, and within a month you'll see new growth. The first year focuses on root development, but by year two, your pups will be thriving with that classic agave shape.
This method works for all agave varieties, from small tequilas to towering blue agaves. The key is timing—wait until the mother plant has fully died back before separating the pups. With proper care, you'll have a whole collection of agaves without spending a dime.
📚 In This Guide
- What you need
- Instructions
- Tips and common mistakes
- Wrapping up and next steps
What you need
- ● Agave pups (base offshoots): 1–5 pups (depending on how many you want to propagate). Ensure they’re at least 3–4 inches tall with their own roots.
- ● Well-draining potting mix: 1–2 gallons (use a cactus/succulent blend or mix 50% potting soil + 50% perlite/pumice for aeration).
- ● Containers: Small pots (4–6 inches in diameter) with drainage holes, or a tray with drainage for grouping pups.
- ○ Rooting hormone (optional but helpful): A small bottle (like Clonex or Dyna-Gro) to boost root growth.
- ● Spray bottle: For gentle watering (avoid soaking!).
- ● Gloves (recommended): Agave spines can be sharp—protect your hands!
- ● Clean, sharp knife or pruners: Sterilized with rubbing alcohol to prevent disease.
- ○ Damp paper towels or a humidity dome: To maintain moisture while roots establish (optional for arid climates).
- ● Bright, indirect light: A sunny windowsill or grow light (avoid direct midday sun for the first 2 weeks).
- ● Patience (and a little luck!): Pups typically root in 4–8 weeks, but some may take longer.
- ● 🌡️ Water sparingly: Let the soil dry completely between waterings—agave hates soggy roots!
- ● ✨ Choose healthy pups: Look for firm, plump bases with no mushy or discolored spots.
- ● 🔄 Repot gradually: Start with small pots, then upgrade as the pup grows (after 6–12 months).
How to propagate agave pups from a death bloom
Here's how I turn a single agave's dramatic final bloom into four new plants—no fancy tools, just patience and sharp eyes.
🌱 Step 1: Identify and Wait for the Right Time
Agave pups form naturally at the base of the mother plant, especially after the dramatic "death bloom" appears. Wait until the central stalk has fully flowered and begun to die back—this signals the plant is redirecting energy to produce pups. You'll see small rosettes emerging from the base, typically within 4-8 weeks after blooming.
Don't rush this process. Pups need to develop their own 3-4 inch diameter and 4-6 inches of root before separation. I check by gently lifting the pup to see if roots cling together—if they pull apart easily, it's not ready yet. This usually takes 3-6 months total from bloom onset.
✂️ Step 2: Separate Pups with Clean Cuts
Once pups have established roots, use a sharp, sterilized knife or pruning shears to sever them from the mother plant. Make a clean cut at the base where the pup meets the mother, angling slightly downward to prevent water pooling. I find a 45-degree angle works best—it gives more surface area for healing while directing water away from the cut.
Remove any old, dried leaves from the base of the pup and trim the mother plant's dead bloom stalk completely. This encourages the mother to focus energy on recovery rather than maintaining dead tissue. Wear gloves—agave sap can irritate skin, and the sharp edges of dried leaves are unforgiving.
🪴 Step 3: Prepare Pots and Soil for New Plants
Fill 6-inch diameter pots with a cactus/succulent mix that drains quickly—agave roots rot faster than they grow. I add 20% perlite to the mix to prevent compaction. Each pup gets its own pot, and I make sure the drainage holes are clear before adding soil. Place a small layer of coarse sand or gravel in the bottom to further improve drainage.
Create a shallow planting hole in the center of each pot—just enough to accommodate the pup's roots without burying the base. Agave pups need to stay slightly elevated to prevent rot. Water lightly after planting, but don't soak the soil. The goal is to moisten the roots without creating a soggy environment.
☀️ Step 4: Acclimate and Care for New Growth
Place the newly potted pups in a location with bright, indirect light for the first 7-10 days to reduce transplant shock. Gradually introduce them to full sun over the next 2 weeks. You'll notice new growth appearing within 3-4 weeks if conditions are right—a sure sign the pup is establishing itself.
Water only when the soil feels completely dry to the touch, typically every 2-3 weeks in warm weather. Overwatering is the #1 killer of agave pups. I use the "finger test"—stick your finger 1 inch into the soil; if it's dry, it's time to water. Avoid getting water on the leaves to prevent rot and fungal issues.
⏰ Step 5: Monitor and Encourage Healthy Development
After 6-8 weeks, check each pup's root system by gently removing it from the pot. If roots fill the container and show no signs of rot, it's ready to graduate to a slightly larger pot. I repot into 8-inch diameter containers at this stage, using fresh cactus mix. This gives the plant room to grow while maintaining optimal drainage.
Fertilize lightly with a balanced, diluted succulent fertilizer once in the first growing season—typically in spring or early summer. Too much fertilizer can burn tender new roots. Watch for signs of stress like yellowing leaves or soft stems, which usually indicate overwatering or poor drainage. Adjust your care routine immediately if you spot these issues.
Tips & tricks for propagating agave pups from death blooms
Here's what I wish I knew before propagating my first agave pups—these tricks will help you avoid the rookie mistakes I made.
Patience is key in Step 1: Those 3-6 months waiting for pups to develop roots might feel long, but rushing leads to weak, underdeveloped plants. I learned this the hard way when my first batch of pups withered after only 2 months—they simply weren't ready. Check root development by gently tugging: if the pup stays attached, it's not ready yet. The 3-4 inch diameter rule is non-negotiable for healthy growth.
The cut angle matters in Step 2: That 45-degree angle isn't just for looks—it creates more surface area for healing while directing water away from the cut. I used to make straight cuts, which led to water pooling and rot. Sterilize your tools first (rubbing alcohol works great) to prevent infections. And always wear gloves—the sap can cause skin irritation and those dried leaves have razor-sharp edges.
Soil science in Step 3: The 20% perlite isn't just optional—it's crucial for preventing compaction. I tried skipping it once and ended up with soggy roots that rotted within weeks. That shallow planting hole is equally important: agave pups need to stay slightly elevated to prevent rot. After planting, give the soil just a light mist—you're not watering the plant, you're just moistening the roots.
Light transition in Step 4: That 7-10 day period of bright indirect light is critical for reducing transplant shock. I made the mistake of moving my pups straight to full sun, and they developed sunburn spots that took months to heal. Gradually introduce full sun over 2 weeks—your pups will thank you with vibrant new growth appearing within 3-4 weeks if everything's right.
Pro Tips for Agave Death Bloom Pups
- Here's what I wish I knew before propagating my first agave pups—these tricks will help you avoid the rookie mistakes...
- Patience is key in Step 1: Those 3-6 months waiting for pups to develop roots might feel long, but rushing leads to w...
- The cut angle matters in Step 2: That 45-degree angle isn't just for looks—it creates more surface area for healing w...
Frequently asked questions
Got questions about agave death bloom pups?
Here are answers to the most common ones—so you can propagate with confidence!
What do I do with agave pups after the death bloom?
Once the mother plant blooms and dies, its pups (baby offshoots) are ready for propagation! Carefully dig them up with a sharp knife, ensuring each has roots and a portion of the base. Let the cuts heal for 1-3 days before planting in fresh soil. Pro tip: Pups thrive in well-draining cactus/succulent mix—just like their parent!
How long does it take for agave pups to root?
Most agave pups root in 2-6 weeks if kept in warm (70-85°F), bright, indirect light. Avoid overwatering—they rot faster than they root! A humidity dome (like a plastic bag) can speed things up, but remove it once roots appear. Patience pays off—healthy roots mean a stronger plant!
Can I propagate agave pups without waiting for the death bloom?
Agave plants often produce pups before blooming. Simply separate healthy pups (with roots) from the mother plant and pot them up. Just be gentle—damaged roots slow growth. Bonus: Early propagation gives you more time to grow mature plants before the big bloom!
Why did my agave pup turn mushy or rot?
Overwatering or poor drainage are the usual culprits. Agave pups hate soggy soil—let the top 2-3 inches dry out between waterings. If rot sets in, trim away mushy areas with sterile scissors, let the cut dry, and repot in fresh, gritty mix. Prevention tip: Use a pot with drainage holes and perlite in the soil!
How many pups should I expect from one agave plant?
It varies! Some agave produce 1-3 pups over years, while others (like Agave americana) may send up 5+ after blooming. Size matters too—larger plants often yield more pups. Don’t rush to remove them; let the mother plant support them until they’re self-sufficient (usually 1/3 the size of the parent).
Wrapping up and next steps
Watching your agave send up its dramatic death bloom is a breathtaking moment—but the real magic happens with those pups!
By learning to propagate these base offshoots, you’re not just saving your plant; you’re multiplying your green-thumb success. 🌱 Whether you’re a beginner or a seasoned grower, these pups are your ticket to a thriving agave family.
Ready to take the next step? Grab those clean tools, pick your preferred method (soil or water), and start propagating your pups today. Before you know it, you’ll have a garden full of agaves—and maybe even a few to share with fellow plant lovers! 🌿✨