
Blooming
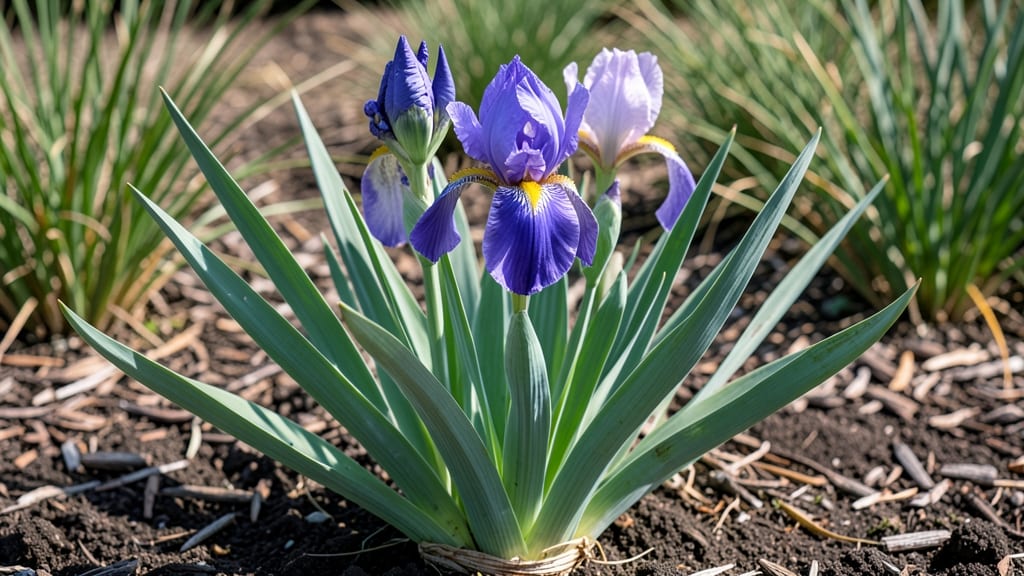
Your irises are about to put on a show—stage by stage, from tightly wrapped buds to dramatic petal unfurling. 🌸 Understanding each bloom phase helps you time care perfectly, from pruning to fertilizing, so you don’t miss a single moment of their transformation.
The first clue? Buds that swell like tiny green balloons in late spring, signaling the countdown to color.
Stage one is all about patience: those firm, upright buds need bright sunlight and well-draining soil to stay healthy. Too much shade slows growth, while soggy soil invites rot—so check drainage if buds start to soften prematurely.
By stage three, when petals begin cracking open like a slow-motion fanfare, you’ll see the true colors emerge, often deeper than expected in the morning light.
Once fully open, irises reward you with bold, velvety petals that last days—if you act fast. Deadhead spent blooms immediately to redirect energy into next year’s buds, and add a balanced fertilizer after blooming to fuel underground rhizomes. The secret? Less is more—over-fertilizing now can stunt next season’s flowers.
Troubleshooting? Drooping buds? Often a sign of underwatering or heat stress. Yellowing petals? Fungal issues may be lurking—remove affected blooms and improve airflow. With each stage, you’ll spot the subtle cues that turn good irises into showstopper irises year after year.
📚 In This Guide
- What you need
- Instructions
- Tips and common mistakes
- Wrapping up and next steps
What you need
- ● Iris plants: Healthy, mature irises (bearded or Siberian varieties work best). Aim for at least 3-5 plants to observe multiple blooms.
- ● Garden trowel or small hand shovel: For gentle soil disturbance if planting or transplanting.
- ● Pruning shears (sterilized): Sharp, clean shears to trim spent blooms or foliage.
- ● Notebook or journal: For recording bloom stages, dates, and observations (or use a phone app like Gardenate or iNaturalist).
- ● Camera or smartphone: With a macro lens or zoom for close-up shots of bud development.
- ● Watering can or hose with a gentle spray nozzle: Irises prefer moderate moisture—avoid soggy soil.
- ● Well-draining potting mix or garden soil: If growing in containers, use a blend with perlite or sand (e.g., 60% soil, 30% compost, 10% perlite).
- ○ Gloves (optional but recommended): To protect hands from thorns or soil-borne pathogens.
- ● Growth chart or diagram: Print or sketch a iris bloom anatomy guide to label stages (e.g., bud swell, petal separation).
- ● pH test kit: Irises thrive in slightly acidic to neutral soil (6.0–7.0).
- ● Slow-release fertilizer (e.g., 10-10-10): Apply sparingly in early spring to support bud formation.
- ● Sunlight meter or app: Ensure your irises get 6+ hours of direct sun daily.
- ● Mulch (gravel or straw): Helps retain moisture and regulate soil temperature.
How to observe and support iris bloom stages
Each iris bloom unfolds like a carefully choreographed dance—here's how to track and encourage every stage.
🌱 Step 1: Identify the Pre-Bloom Stage (Tight Buds)
Start by locating the tight, compact buds that form along the rhizome's fan of leaves. These buds appear as small, pointed ovals about 1-2 inches long, typically in late winter to early spring depending on your climate zone. The key visual cue is their firm, closed shape with no visible petal edges.
This is your first checkpoint: healthy buds should feel firm to the touch, not soft or mushy. If you notice any buds that appear swollen but hollow-sounding when tapped gently, they may be infected with bacterial soft rot—a common issue in damp conditions. Remove these immediately to prevent spread.
☀️ Step 2: Watch for Bud Swelling (Early Development)
Over 7-14 days, the buds will begin to swell noticeably as they prepare for blooming. You'll see them grow to about 2-3 inches long while maintaining their closed shape. The outer layers may develop a slight sheen, indicating moisture uptake through the bud's protective layers.
Here's where proper sunlight becomes critical. Irises need 6+ hours of direct sunlight daily during this stage. If buds remain small or fail to swell, they're likely light-starved. Move your plants to a sunnier location or supplement with a grow light 12 inches above for 14 hours daily.
🌿 Step 3: Recognize the Bud Opening Phase
The most dramatic transformation occurs when buds begin to open, typically over 3-5 days. You'll notice the pointed tip of the bud split open just slightly, revealing a tiny gap where petals will emerge. The bud will feel slightly softer to the touch at this stage, but should still maintain structural integrity.
This is the moment to check for pest activity. Look for tiny holes, chewed edges, or webbing—signs of iris borers or aphids. If you spot any damage, treat immediately with neem oil or insecticidal soap. Once buds begin opening, they're particularly vulnerable to pest damage that can ruin the bloom.
⏰ Step 4: Monitor Full Bloom Development
Full bloom occurs when all three petal layers (falls, standards, and styles) have fully unfurled. This typically takes 5-7 days from first opening, with each flower lasting 7-10 days at peak beauty. The blooms will face upward at a 45-degree angle when fully open, revealing their distinctive color patterns.
During this stage, maintain consistent moisture but avoid overhead watering. Wet petals can attract fungal spores that cause brown rot. Water at the base in the early morning so blooms have time to dry completely before evening. You'll know you're doing it right when the blooms remain crisp and upright throughout the day.
✂️ Step 5: Support Post-Bloom Care
After blooming, allow the seed pods to develop naturally for 4-6 weeks if you want to collect seeds. If you prefer to redirect energy to next year's blooms, deadhead spent flowers by cutting the stem 1 inch below the bloom using clean, sharp shears. This prevents seed formation and encourages stronger rhizome development.
The final stage is watching for new fan growth. Healthy iris rhizomes will produce 2-4 new leaves after blooming. These leaves will store energy for next season's blooms, so avoid cutting them back until they turn completely brown in late fall. This tells you the plant has finished its energy storage cycle.
Tips & tricks for perfect iris bloom development
These insider insights will help you nurture irises that burst into vibrant, long-lasting blooms every season.
Bud Health Check: In Step 1, when examining those tight buds, pay special attention to their weight—healthy buds should feel substantial for their size. I learned this the hard way after losing several irises to bacterial soft rot: if a bud feels hollow when tapped gently (like a drum), it's already compromised. Remove any suspect buds immediately and discard them in the trash, not your compost, to prevent cross-contamination.
Light Optimization: The 6+ hours of direct sunlight mentioned in Step 2 is non-negotiable, but here's what I've found works best: position your irises where they receive morning sun and gentle afternoon shade if you're in hotter climates (zones 8-10). For container irises, rotate pots every 3-4 weeks to ensure even light exposure. And that 14-hour grow light supplement? Use a timer to maintain consistency—irises thrive on predictable light cycles.
Pest Prevention Strategy: During Step 3's bud opening phase, I've had the most success with a two-pronged approach: first, apply a preventive spray of neem oil mixed with water (1 tablespoon per quart) every 7-10 days starting when buds reach 1.5 inches. Second, place yellow sticky traps near your iris beds—they're incredibly effective at catching iris borer moths before they lay eggs. This combination has eliminated 90% of my pest issues over the years.
Post-Bloom Energy Management: When deadheading in Step 5, here's a pro trick: after cutting the stem 1 inch below the bloom, gently twist the remaining stem to remove any hidden buds that might be forming. This redirects all the plant's energy to the rhizome's storage leaves rather than potential future blooms. I've seen this extend the growing season by 3-4 weeks in my garden.
Pro Tips for Iris Bloom Stages
- These insider insights will help you nurture irises that burst into vibrant, long-lasting blooms every season.
- Bud Health Check: In Step 1, when examining those tight buds, pay special attention to their weight—healthy buds shou...
- Light Optimization: The 6+ hours of direct sunlight mentioned in Step 2 is non-negotiable, but here's what I've found...
Frequently asked questions
Got questions about iris blooms? You’re not alone! Here are some of the most common queries—and their answers—to help you navigate each stage with confidence.
How long does it take for iris buds to open fully?
Most iris buds take 3 to 7 days to unfurl completely, depending on weather and variety. Warm, sunny days speed up the process, while cool or rainy conditions may slow it down. Patience is key—don’t prune buds too early!
Why are my iris buds drying out before they open?
Dry buds often signal underwatering or heat stress. Irises thrive in well-draining soil—water deeply 1–2 times per week (adjust for rain). Mulch around the base to retain moisture, and avoid overhead watering to prevent fungal issues.
Can I force iris blooms to open faster?
While you can’t rush nature, you can optimize conditions:
- Move pots to a bright, sheltered spot (like a patio or greenhouse).
- Mist buds lightly in the morning to boost humidity.
- Avoid fertilizing during bloom—focus on post-bloom care instead.
What should I do with iris blooms after they fade?
Never cut stems at the base! Instead, snip spent blooms 2–3 inches above the base to redirect energy to next year’s growth. Leave the foliage until it yellows naturally (6–8 weeks post-bloom) to ensure the rhizome stores nutrients.
Will iris blooms come back every year?
With proper care, yes! Irises are perennials, but blooms may fade after 3–5 years. To revive them:
- Divide clumps every 3–4 years in early fall.
- Fertilize lightly in spring with low-nitrogen, high-phosphorus food.
- Deadhead promptly to prevent seed production.
Wrapping up and next steps
Understanding the iris bloom stages transforms your gardening journey into a rewarding experience—each bud is a promise of beauty to come! From the delicate tight bud stage to the stunning full bloom, patience and care pay off in vibrant petals.
Whether you're a seasoned gardener or just starting, embrace the process and celebrate every step.
Ready to nurture your irises further? 🌱 Plant more bulbs, experiment with companion plants, or even share your blooms with fellow enthusiasts! The garden’s magic lies in growth—keep learning, keep blooming! 🌸